
Add to Cart
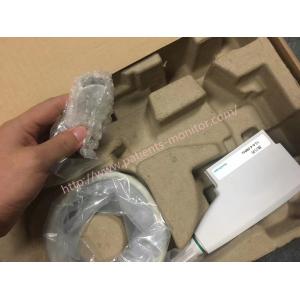
C613 SonoScape Micro-Convex Transducer Transducer 4.0-13.0 MHz For E5 Exp/E5/E5 Pro/E3 Exp/E3/ E3 Pro/E2 Exp/ E1 Exp/E1//E1 Pro
The SonoScape E-Series supports a wide variety of probes, making the system extremely flexible. The schematic diagram of the probe is as follows
Body Surface Probe
Endocavitary Probe
The available probes are listed as follows
| Probe Model | Application |
L741, 3C-A, 3P-A,7P-B, 12L-B, C613, PWD2.0, 12LI-A, 10I2, 6CT-A | Body surface |
| 6V1, 6V3, EC9-5 | Intracavitary |
Features for C613 probe
| Application | Abdomen, Cardiac, Urology, Pediatrics |
| Center frequency | 6.5MHz |
| Field of View | 90° |
| Bandwidth | 4.0-13.0 MHz |
| Radius | 14 mm |
Cautions
Be especially careful before using the probe
Check the probe before each use. Stop using the probe immediately if you find the following damage.
■ Application of the probe to the body surface
1. Put on sterile medical gloves.
2. Connect the probe.
3. Run a scan.
■ Endocavitary Probe Usages
1. Put on sterile medical gloves.
2. Cover the probe with the probe cover (only for Intralight probes).
A. Remove the packaging and open the probe cover.
B. Apply an appropriate amount of coupling gel inside the sheath and on the surface of the probe
C. Hold the tube and flip the cap over the tube.
D. Pull the probe cover tightly over the probe surface to remove wrinkles.
E.Secure the cover to the pipe with tape or a rubber band
3. Position the probe Before scanning, check the orientation markings on the probe.
4. Run a scan.
Cleaning the Probe
The probe should be cleaned before and after each use. Cleaner research is an important step in disinfection and sterilization. Follow the steps below to clean your study.
1.After inspection, remove the coupling gel from the probe surface.
2. Disconnect the examiner from the system and remove the test cap and tissue sample holder from the examiner.
3. Clean the meter with a soft, lint-free cloth dampened with mild soapy water or the recommended detergent (see Appendix D.2 Detergent). If there are dry spots on the surface of the probe or in the cracks, use a brush to remove them. Moisten them with enzyme detergent.
Rinse the examiner's surface with clean tap water to completely remove any detergent residue.
5. Wipe the meter with a soft, dry, lint-free cloth.
If you have any interest in C613 SonoScape Micro-Convex Transducer Transducer 4.0-13.0 MHz For E5 Exp/E5/E5 Pro/E3 Exp/E3/ E3 Pro/E2 Exp/ E1 Exp/E1//E1 Pro ,feel free to contact us .