CC Magotan 2.0 3.6 Fuel Pump Assembly Parts Petrol 3C0 919 051 AE AK 3AA 919 051C
Brand Name:MANER
Certification:ISO9001/TS16949
Model Number:3C0 919 051 AE AK
Minimum Order Quantity:10pcs/consultation
Delivery Time:5-15 work days
Payment Terms:L/C T/T Paypal Western union
Contact Now
Add to Cart
Verified Supplier
Location:
Beijing Beijing China
Address:
4th Floor, No.56th Fangyuan Business Building, Zhongguancun South Street, North Xiaguan Street, Haidian District, Beijing
Supplier`s last login times:
within 22 hours
Shipping
lt's easy to get a shipping quote! Just click the button below and complete the short form.
Get Shipping Quote
Product Details
Company Profile
Product Details
Fuel Pump Assembly Fit VW Passat CC Magotan 2.0 3.6 3C0 919 051 AE AK 3AA 919 051C
OE Information :
VAG ---3AA 919 051C 3C0 919 051G 3C0 919 051AE 3C0 919 051AK 3AA 919 051L
VW----3AA 919 051C 3AA 919 051L
Link Vehicle :
For Volkswagen Passat (3C2) 1.8 TSI
1. Construction Type : Saloon
2. Construction Year : 05.2007-07.2010
3. Power : 160hp
4. Cylinder Capacity: 1798 ccm
For Volkswagen Passat (3C2) 2.0 TSI
1. Construction Type : Saloon
2. Construction Year : 03.2005-07.2010
3. Power : 150hp
4. Cylinder Capacity: 1984 ccm
For Volkswagen Passat (3C2) 2.0 TSI
1. Construction Type : Saloon
2. Construction Year : 07.2005-07.2010
3. Power : 200hp
4. Cylinder Capacity: 1984 ccm
For Volkswagen Passat (357) 1.8 TSI
1. Construction Type : Coupe
2. Construction Year : 06.2008-01.2012
3. Power : 160hp
4. Cylinder Capacity: 1798 ccm
For Volkswagen Passat (357) 2.0TSI
1. Construction Type : Coupe
2. Construction Year : 11.2010-01.2012
3. Power : 211hp
4. Cylinder Capacity: 1984 ccm
| Type | FUEL PUMP ASSEMBLY |
| Model | 3C0 919 051AE 3AA 919 051C |
| Size | Standard |
| MOQ | Normally MOQ is 1pcs |
| Car make | GERMANY CARS |
| Port | Guangzhou Port |
| Package | Neutral package or as per customers instruction. MANER Brand Packing |
| Warranty | 1 year |
| Payment terms | 30% deposit advanced, the balanced to be paid before shipment. |
| Western union / Paypal / TT are welcomed. | |
| Delivery time | 5-15working days after deposit. |
| Transport | Normally by sea, small quantities can be sent by express. |
| Advantages | ISO/TS 16949 certification. |
| Four steps for product testing | |
a. components testing b. unfinished functions testing c.assembly testing d. testing before delivery. | |
| Quality guaranteed with one year warranty. | |
| High flow, low resistance. | |
| Long working lifetime | |
| 100% Condition New | |
| Service | Treat customers as friends |
| Prompt reply | |
| Best service before and after service |
FUEL PUMP REPLACEMENT INSTRUCITONS
I. Preparations
A. Fuel systems are under pressure.It is necessary to relieve the
fuel system pressure before beginning work on the fuel system.
Relieving the pressure can be done by removing the fuel cap.
1. Locate and remove the fuel pump fuse from the fuse block.
2. After the fuse is removed, start the engine and left the engine
consume the remaining gasoline in the fuel lines.The engine will
stop when stop when remaining fuel is consumed.
3. Once the engine has stopped, crank the engine for three seconds
to relieve any possible remaining fuel pressure.
B. Disconnect the vehicles negative/ground cable at the battery and
secure it so that it will not accidentally make a connection while
replacing the fuel pump.
C. Drain the gasoline from the vehicle's fuel tank.
1. Using only and OSHA approved gasoline transfer pump and approved
fuel storage containers, remove as much gasoline as from the fuel
tank through the filler neck.
2. Raise the vehicle with an automotive hoist or jack up the
vehicle and support it with OSHA approved jack stands, which allow
unobstructed clearance for the removal of the fuel tank.
3. Fuel tank gasoline levels will vary depending on the amount of
gasoline removed through the filler neck. Once the vehicle is
raised, additional gasoline can be removed through bracket
connections.
II. Fuel Tank Removal
Fuel tanks vary from vehicle to vehicle; the following fuel tank
removal instructions are for a typical fuel tank removal. For more
specific instructions on fuel tank removal for your specific
vehicle it may be necessary to obtain an approved service manual
for the vehicle that you are replacing the fuel pump on.
1. Visually inspect the scope of work involved before beginning the
fuel tank removal step.Be sure to have help readily available.
2. Disconnect all visible fuel hoses that connect to the fuel tank
from the rest of the vehicle (be sure to mark or label all
connections for reassembly).
3. Disconnect electrical connections at the fuel tank taking extra
care not to damage pins or connectors.
4. If necessary, disconnect and remove the fuel filler neck from
the vehicle.
5. Loosen the retaining straps of the fuel tank and support the
fuel tank prior to removing the straps entirely. Take extra
precautions to avoid a fuel spill.
6. Take note of the condition and location of any insulating
pads.Worn or misaligned, wrongly installed
pads should be replaced as they may affect the performance of the
new fuel pump.
III:Bracket Removal
1. Before removing the bracket from the fuel tank,be sure to
thoroughly clean any dirt or debris that may have accumulated at
the top of the fuel tank or at the opening of the locking ring
area.This step must be done to prevent debris or foreign matter
from entering the fuel tank which can cause problems later on.
2. Using the correct tppls,remove the locking ring or retainer
using care not to damage it.
3. Carefully lift out the bracket from the fuel tank. The old
O-ring seal must be removed using extra care not to let pieces fall
into the tank as it may be brittle. Discard the old O-ring seal,it
will be replaced with a new O-ring seal which is included in the
kit.
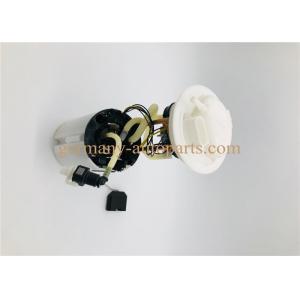
Picture Show :

CC Magotan 2.0 3.6 Fuel Pump Assembly Parts Petrol 3C0 919 051 AE AK 3AA 919 051C
Inquiry Cart
0